- Getting Started
- Security Configuration
- Get your JavaScript Widget up and working
- Advanced Settings
- reCAPTCHA
- Adding Email Validation to Specific Form
- Adding Email Valdiation to Asynchronous or Deferred Form
- Email Validation on Popup Forms during Form Submission
- Integrate custom email validation using the verify() method
- Customizing Feedback Error Message
- Activate / Deactivate the apps
- Deleting the unused / old apps
- Reset / Regenerate the Token
Note: JavaScript Widget 2.0 is no longer supported. We recommend using Form Guard for best features and support
JavaScript Widget 2.0 - Overview
Clearout JavaScript Widget comes handy for non-developers to easily integrate real-time verification to all kinds of online forms. This will let a user capture all valid prospects right at the time of form filling avoiding the loss of any opportunity
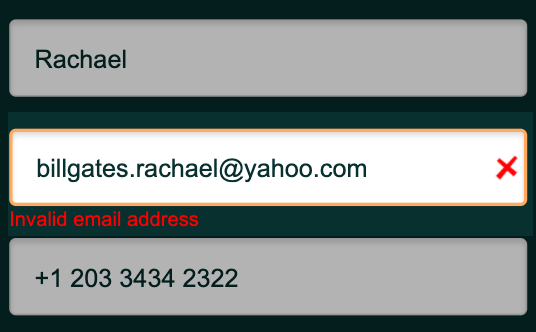
Can't wait!!! Check out our demos to know the real-time validation in actions
Getting Started with JavaScript Widget
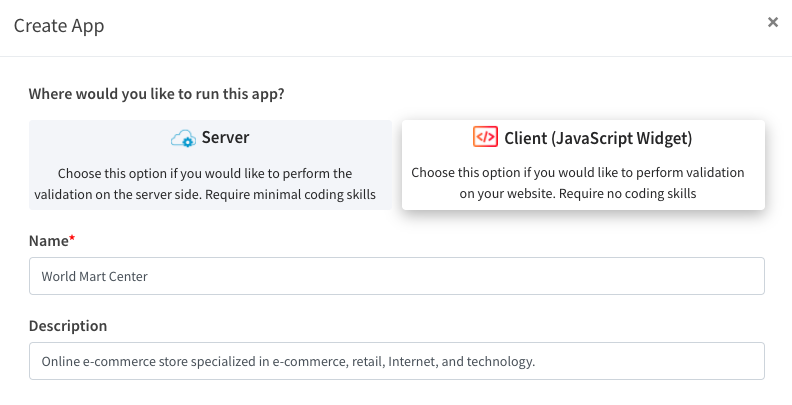
Create your JavaScript Widget from the Apps page by clicking on 'Create App' and by choosing run type as 'Client'. As part of Clearout Apps creation you will be asked to decide how and where the validation needs to be performed. This helps prevent the mishandling of credits and from abusers by setting access threshold across domain, URL and/or IP.
Security Configuration:
Limit Usage:
You can take full control in avoiding abuse by limiting the usage specifying the domains or IP addresses from which the verification should happen. This will further help in using the credits effectively. It is always advisable to specify a limit either at a global level or specific to IPs. Failing to do so might deplete the credit balance sooner. There will be no limits applied by default.

Add URLs:
You can prevent abuse by adding URLs that limit where on the website email verification is permitted. By the way, URLs can contain wildcards to specify whether verification should be performed on the entire website or a subset of websites, as shown in the image below.

Get your JavaScript Widget up and working:
Once the client-side app is created, you will be given a code snippet with the corresponding API token that needs to be inserted anywhere before the closing body tag. Upon saving the snippet as a component of the form, the client-side app begins verifying the emails.
                  <script>
                    var clearout = window.clearout = window.clearout || [],
                    opts = {
                      app_token: "REPLACE_WITH_YOUR_CLIENT_APP_TOKEN",
                      mode: "ajax",
                      block_role_account: true,
                      feedback_role_account_message: "Don't use a role-based account, please",
                    };
                    clearout.push(["initialize", opts]),
                        function () {
                          var t = document,
                            e = t.createElement("script"),
                            a = t.getElementsByTagName("script")[0];
                          e.type = "text/javascript", e.async = !0,
                          e.src = "https://clearout.io/wp-content/co-js-widget/clearout_js_widget.js",
                          a.parentNode.insertBefore(e, a)
                        }();
                  </script>
With the mentioned snippet's basic settings you can capture the valid business email addresses. In case you wanted to accept free accounts or other such accounts, you can make use of the advanced settings.
Things to remember
- In case the account used to generate the app token runs out of credits, the form submissions will be allowed even if the email is invalid
- In case of throttle limits are exceeded, the form submissions will be allowed even if the email is invalid
Advanced Settings:
Once the code snippet is generated, you can specify the settings for the widget against the 'opts'. Initially the code snippet only contains 'app_token' which is the user identifier and 'mode' which is configured to ajax by default. These settings are enough to make the widget working. You can configure the additional settings as below;
<script type="text/javascript">
var clearout = window.clearout = window.clearout || [];
var opts = {
app_token: YOUR_CLIENT_APP_TOKEN,
/**
*Replace 'YOUR_CLIENT_APP_TOKEN' with your public token
*/
safe_to_send_only: false,
/**
*The option to block the emails that Clearout verification returns safe_to_send as false -
*default is 'false'
*This option Supersedes every other block settings
*/
optional_email: false,
/**
*Setting this option to 'true' allows form submission with empty email field value,
*however any non-empty value will undergo validation - default is 'false'
*/
block_role_account: true,
/**
*The option to accept or reject the Role based accounts (true/false) - default is 'false'
*/
block_free_account: true,
/**
*The option to block Free accounts (true/false) - default is 'false'
*/
block_disposable_account: true,
/**
*The option to block Disposable accounts (true/false) - default is 'true'
*/
block_unknown_status: false,
/**
*The option to block the emails that Clearout verification gives Unknown result (true/false) -
*default is 'false'
*/
block_catchall_status: false,
/**
*The option to block the emails that Clearout verification gives Catchall result (true/false) -
*default is 'false'
*/
block_gibberish_account: false,
/**
*The option to block the emails that Clearout verification classifies as gibberish -
*default is 'false'
*/
block_form_submission_on_timeout: false,
/**
*The option to block the emails that timedout during the verification process -
*default is 'false'
*/
block_form_submission_on_limit_crossed: false,
/**
*The option to block the emails that are not validated by clearout after the usage limit has crossed -
*default is 'false'
*/
timeout: 10,
/**
*The option to define the maximum time that can be used for verifying the status of the given email address (Number in Seconds)
*/
feedback: true,
/**
*The option to show feedback message for invalid emails (true/false) - default is 'true'
*/
feedback_invalid_classname: "error-msg",
/**
* The option to specify the class name to refer invalid CSS(String) - default is 'error-msg'
*/
feedback_invalid_message: "<span style=\"color:red;font-size:15px;\">Invalid email address</span>",
/**
* The option to specify the HTML String to be displayed when invalid email is entered - default is "Invalid email address"
*/
feedback_free_account_message: "Invalid - <b>Free account</b> not allowed",
/**
*The option to specify the HTML String to be displayed when free account email is entered - default is "Invalid Free account not allowed"
*/
feedback_role_account_message: "Invalid - Role account not allowed",
/**
*The option to specify the HTML String to be displayed when role based email is entered - default is "Invalid - Role account not allowed"
*/
feedback_disposable_account_message: "Invalid - Disposable account not allowed",
/**
*The option to specify the HTML String to be displayed when Disposable email is entered - default is "Invalid - *Disposable account not allowed"
*/
feedback_unknown_message: "Unable to verify the email address, try after sometime",
/**
*The option to specify the HTML String to be displayed when Clearout gives Unknown status post verification default is "Unable to verify the email address, try after sometime"
*/
feedback_catchall_message: "Catch All email not acceptable, please enter a different email address",
/**
* The option to specify the HTML String to be displayed when Clearout gives Catchall status post verification - default *is "Catch All email not acceptable, please enter a different email address"
*/
feedback_safe_to_send_only_message: "Please enter different email, entered email is not safe",
/**
* The option to specify the HTML String to be displayed when a non safe to send email is entered - default *is "Please enter different email, entered email is not safe"
*/
feedback_gibberish_message: "Invalid - Gibberish email address not allowed",
/**
* The option to specify the HTML String to be displayed when a gibberish email is entered - default *is "Invalid - Gibberish email address not allowed"
*/
feedback_google_recaptcha: "Google Recaptcha Verification Failed",
/**
* The option to specify the HTML String to be displayed when Google Recaptcha verification fails - default *is "Google Recaptcha Verification Failed"
*/
feedback_on_timeout_message: "Email could not be verified - timeout occured",
/**
* The option to specify the HTML String to be displayed when email verification timesout - default *is "Email could not be verified - timeout occured"
*/
feedback_on_usage_limit_crossed_message: "Email could not be verified - usage limit crossed",
/**
* The option to specify the HTML String to be displayed when usage limits have crossed - default *is "Email could not be verified - usage limit crossed"
*/
mode: "ajax",
/**
*The option to specify the desired mode of verification (ajax/formSubmit) - default is "ajax"
*/
selector: "user_email",
/**
*The option to specify the email field using specified selector for which verification should happen (classname eg:user_email) - default is empty
*/
submit_button_selector: '.submit-btn',
/**
* The option to specify any valid jquery selector for a submit button to use with formSubmit mode - default is empty
*/
debug: true,
/**
*The option to specify debug console (true/false) - default is 'true'
*/
elements: [{selector: 'ANY SELECTOR' ,opts:'ANY OF THE ABOVE MENTIONED OPTIONS'}],
/**
*This block can be used to `configure any element in the form specifying the selector and the equivalent options as a array - default is empty array
*/
inspect: true
/**
* The option to specify if the field getting verified needs to be highlighted with a border or not default is 'false'
*/
on_before_verify: <function>,
/**
* Use this option to pre-hook into email validation workflow, this callback function will be called with the email and the form object parametres, before the control pass to the Clearout validation, so its a best place to do sanitization or bring your own valiation, by returning false to this callback function will stop triggering Clearout validation
* Example:
* on_before_verify: function({ email, $form }){
* // custom code
* // return true or false
* }
*/
on_after_verify: <function>,
/**
* Use this option to post-hook into email validation workflow, this callback function will be called with the email and the form object parametres after successful execution of Clearout validation along with result, so its a best place to trigger or filter any further operation based on the validation result such as customizing UI or messages, stopping form submit based on result status by returning false
* Example:
* on_after_verify: function({ result, $form }){
* // custom code
* // return true or false
* }
*/
recaptcha_site_key: <GOOGLE_RECAPTCHA_V3_SITE_KEY>,
/**
* Option to specify whether to use Google reCAPTCHA (v3) in * order to prevent bot or abuser from the signup forms.
* <SITE_KEY> needs to be generated and replaced in the above option.
*/
auto_validation: true,
/**
* Option to auto detect the email text field in the forms, setting 'false' won't detect email fields automatically provide a way to specify explicitly - default is 'true'
*/
on_ready: <function>,
/**
* Use this option to attach Clearout validation to the custom forms, most probably this will used when 'auto_validation' option set to false
*Example:
* on_ready: function(){
* // custom code
* }
*/
prefill_validation: false,
/**
* Option to automatically validate prefilled email fields - default is 'false'
*/
suggest_email: true,
/**
* The option to display a suggested email address if the user's entered email address not valid - default is 'true'
*/
suggest_email_message_template: 'Did you mean __SUGGESTED_EMAIL_ADDRESS__ ?',
/**
* The option to specify the suggested email message template. the placeholder __SUGGESTED_EMAIL_ADDRESS__ will be replaced with the real suggested email - default is 'Did you mean __SUGGESTED_EMAIL_ADDRESS__ ?
*/
suppress_form_builtin_error_message_selector: '.error-msg',
/**
* Use this option to suppress the form's built-in error message by specifying the valid jQuery selector of the form's error message element - default is null
*/
submit_button_cursor_style: 'pointer',
/**
* Use this option to set form's submit button cursor style - default is 'pointer'
*/
};
clearout.push(["initialize", opts]),
function () {
var t = document,
e = t.createElement("script"),
a = t.getElementsByTagName("script")[0];
e.type = "text/javascript", e.async = !0,
e.src = "https://clearout.io/wp-content/co-js-widget/clearout_js_widget.js",
a.parentNode.insertBefore(e, a)
}();
</script>
Impact of Emails or Domains Allowlist/Blocklist Settings
In case of an incoming email address or domain is already part of allowlist or blocklist then the verification outcome will be based on that. Above setting options wont have any impact during the verification.
reCAPTCHA:
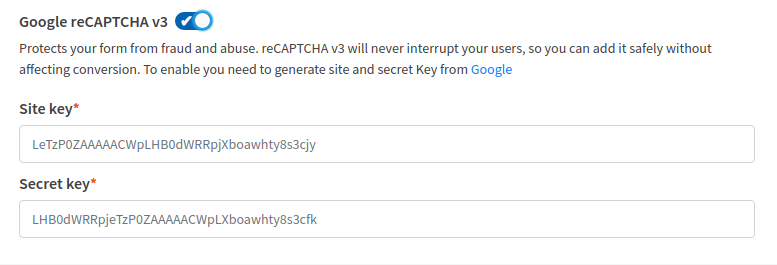
Google reCAPTCHA (v3) helps to determine hackers from abusing the system as they block bots from submitting fake or nefarious online requests.
Captchas can be used to;
- Protect the integrity of online forms by stopping abusers sending in repeated false responses
- Prevent hackers from signing up for multiple accounts
- To make online shopping more secure
So captcha with real-time email validation would generate genuine leads. To enable Google reCAPTCHA (v3) you need to generate site and secret Key from Google
Adding Email Validation to Specific Form
In case if a page has many forms and looking to enable Clearout email validation to a specific form then it require to pass form element as part of the initialization as mentioned below
Find the form element for which Clearout email validation need to be added
Pass the form element as the third parameter in the clearout.push() initialization method
              <script>
                  var clearout = window.clearout = window.clearout || [];
                  var opts = {
                  app_token: "REPLACE_WITH_YOUR_CLIENT_APP_TOKEN",
                  api_url: "https://api.clearout.io",
                  }
                  var form = document.getElementById('YOUR_FORM_ID');  // Step 1
                  clearout.push(["initialize", opts, form]);  // Step 2
                  (function () {
                    var u = "/";
                    var d = document,
                      g = d.createElement("script"),
                      s = d.getElementsByTagName("script")[0];
                    g.type = "text/javascript"; g.async = true;
                    g.src = "https://clearout.io/wp-content/co-js-widget/clearout_js_widget.js",
                    s.parentNode.insertBefore(g, s);
                  })();
              </script>
Adding Email Valdiation to Asynchronous or Deferred Form
In case if the form on the page is set to be rendered dynamically, then wait for the form element to be available before adding it to the Clearout email validation.
              <html>
              <body>
                <div>
                  <!-- page content goes here -->
                  <!-- some script to generate form -->

                </div>

                <!-- Initialize Clearout JS Widget -->
                <script>
                  var clearout = window.clearout = window.clearout || [];
                  var opts = {
                    app_token: "REPLACE_WITH_YOUR_CLIENT_APP_TOKEN",
                    api_url: "https://api.clearout.io",
                    auto_validation: false // STOP ATTACHING VALIDATION AUTOMATICALLY
                  };
                  clearout.push(["initialize", opts]);
                  (function () {
                    var u = "/";
                    var d = document, g = d.createElement("script"), s = d.getElementsByTagName("script")[0];
                    g.type = "text/javascript"; g.async = true;
                    g.src = "https://clearout.io/wp-content/co-js-widget/clearout_js_widget.js",
                      s.parentNode.insertBefore(g, s);
                  })();

                  // Wait for form availability and then attach Clearout email validation
                  var formSelector = ".myformclassname" // any valid jQuery selector
                  var intervalId = setInterval(function () {
                    // check jQuery loaded
                    if ( typeof window.jQuery === "undefined" ) { return; }

                    // jQuery loaded
                    if (jQuery(formSelector).length) {
                      console.log("Form is available")
                      clearInterval(intervalId)
                      intervalId = null
                      window.clearout.emailValidator.attachToForm({ formSelector })
                    }
                  }, 500)

                </script>
              </body>
              </html>
Email Validation on Popup Forms during Form Submission
Most popup form providers will render the form dynamically and even the form submit button would be a custom button created from the <DIV> tag.
In that case, adding clearout validation to the form require mode to be 'formSubmit' rather than 'ajax', also to handle custom submit button it is necessary to take over the button click with a transparent overlay before the actual form submission occur. Below steps illustrate how to take over the form submit button and then attach validation to the form
Switch off the auto-validation mode. Adding Clearout's JS Widget will auto-detect the email fields, by default and attach the validation. This can be disabled by setting 'auto_validation' option to 'false'
Specify which form & submit button on the page requires validation, by setting the form options as mentioned below;
Please change the option values according to your form setting, since the below values are only for reference.
              var formOpts = {
                formSelector: ".my-form",
                /** specify form selector - mandatory option */
                submit_button_selector: ".my-form-submit-btn",
                /** specify form submit button - forces formSubmit mode */
                mode: "formSubmit",
                /** either ajax or formSubmit - default ajax */
                submitButtonOverlay: true /** whether to overlay transparent container or not - default true */
            }
Pass the form option(formOpts) to the Cleaout emailValidator service method attachToForm() as part of the widget on_ready callback as mentioned below;
              var coJsWidgetReady = function() {
                console.log("Clearout.onReady called...attaching form for validation")
                var formOpts = {
                    formSelector: ".my-form",
                    /** specify form selector - mandatory option */
                    submit_button_selector: ".my-form-submit-btn",
                    /** specify form submit button - forces formSubmit mode */
                    mode: "formSubmit",
                    /** either ajax or formSubmit - default ajax */
                    submitButtonOverlay: true /** whether to overlay transparent container or not - default true */
                  }
                  clearout.emailValidator.attachToForm(formOpts)
                }
The final snippet code would look something like below and needs to be inserted on the page where the form will be rendered.
              var coJsWidgetReady = function () {
                console.log("Clearout.onReady called...attaching form for validation")
                var formOpts = {
                  formSelector: ".my-form",
                  /** specify form selector - mandatory option */
                  submit_button_selector: ".my-form-submit-btn",
                  /** specify form submit button - forces formSubmit mode */
                  mode: "formSubmit",
                  /** either ajax or formSubmit - default ajax */
                  submitButtonOverlay: true/** whether to overlay transparent container or not - default true */
                }
                clearout.emailValidator.attachToForm(formOpts)
              }

              var clearout = window.clearout = window.clearout || [];
              var opts = {
                app_token: 'REPLACE_WITH_YOUR_CLIENT_APP_TOKEN',
                api_url: "https://api.clearout.io",
                auto_validation: false,
                on_ready: coJsWidgetReady
              }
              clearout.push(["initialize", opts]);
              (function () {
                var u = "/";
                var d = document,
                  g = d.createElement("script"),
                  s = d.getElementsByTagName("script")[0];
                g.type = "text/javascript"; g.async = true;
                g.src = "https://clearout.io/wp-content/co-js-widget/clearout_js_widget.js",
                s.parentNode.insertBefore(g, s);
              })();
Note: Please contact us@clearout.io, if none of the above methods help you integrate Clearout email validation on the form
Integrate custom email validation using the verify() method
Use the clearout.emailValidator.verify() method at your disposal in situations where you need to implement your own form validation with Clearout's real-time email validation for the email field. To find out more about the integration, please take a look at the code example below.
              <html>
              <body>
                <div>
                  <!-- page content goes here -->
                  <!-- Form goes here -->

                </div>

                <!-- Initialize Clearout JS Widget -->
                <script>
                  var clearout = window.clearout = window.clearout || [];
                  var opts = {
                    app_token: "REPLACE_WITH_YOUR_CLIENT_APP_TOKEN",
                    api_url: "https://api.clearout.io",
                    auto_validation: false // STOP ATTACHING VALIDATION AUTOMATICALLY
                  };
                  clearout.push(["initialize", opts]);
                  (function () {
                    var u = "/";
                    var d = document, g = d.createElement("script"), s = d.getElementsByTagName("script")[0];
                    g.type = "text/javascript"; g.async = true;
                    g.src = "https://clearout.io/wp-content/co-js-widget/clearout_js_widget.js",
                      s.parentNode.insertBefore(g, s);
                  })();

                  // Custom Submit button handler to do validations before submitting form
                  $('.submit-btn').on('click', async function(e){
                    e.preventDefault()
                    <!-- Custom validations and code goes here -->

                    // Calling Clearout's Email validation
                    let result = await clearout.emailValidator.verify(email, options)
                    if (result && result.data && result.data.free === 'yes') {
                      <!-- Code to ask user to enter business email -->
                    }
                  })

                </script>
              </body>
              </html>
Note: Please contact us@clearout.io, if none of the above methods help you integrate Clearout email validation on the form
Customizing Feedback Error Message
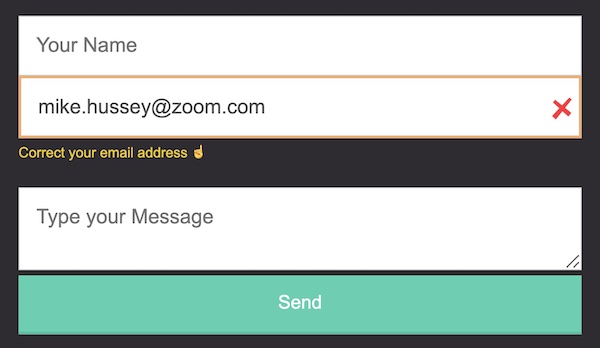
If you want to change the error message text or apply the styling, please check all the options that start with feedback_ as they are of HTML string type, so feel free to update the text that suits your requirement and use inline HTML style or classname to change the look and feel.
Check out the code snippet and screenshot below to see how the feedback message text and styling have been modified.
                <script>
                  var clearout = window.clearout = window.clearout || [],
                  opts = {
                    app_token: "REPLACE_WITH_YOUR_CLIENT_APP_TOKEN",
                    mode: "ajax",
                    block_role_account: true,
                    feedback_invalid_message: "<span style=\"color:#f1cb03;font-size:10px;\">Correct your email address ☝</span>",
                  };
                  clearout.push(["initialize", opts]),
                      function () {
                        var t = document,
                          e = t.createElement("script"),
                          a = t.getElementsByTagName("script")[0];
                        e.type = "text/javascript", e.async = !0,
                        e.src = "https://clearout.io/wp-content/co-js-widget/clearout_js_widget.js",
                        a.parentNode.insertBefore(e, a)
                      }();
                </script>
Activate / Deactivate the apps:
If you want to disable any app temporarily, you can click on the toggle button against the app under the status column. Verification will not be carried out as long as the status of the app remains 'Inactive'. You can resume the verification by turning the toggle to an active state.

Deleting the unused / old apps:
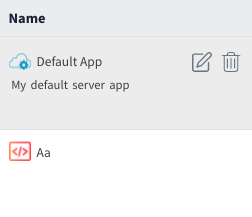
Any unused app can be deleted by clicking the delete icon against the app. On hovering over the app name, the option to delete will be visible.
Reset / Regenerate the Token:
Whenever an abuse is identified while you are still in control of the usage,you may reset the apps. Resetting any app, provides two options;
- Deactivating the existing token in use . The token will expire immediately(in case of an abuse identified)
- Keep the already active token working for an hour post resetting(which might be helpful in case of migrating to a newer setup). Once the first hour completes, the old token will not work.
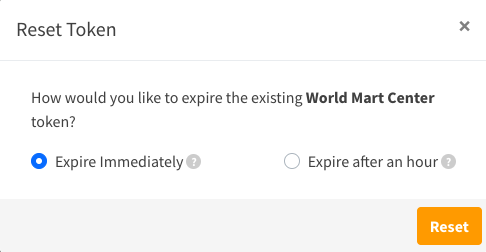
It is always advisable choosing 'Expire Immediately' if any sort of abuse is identified. On successful resetting of the token, make sure to update the form code with the new token.