Test Webhooks
This guide explains how to test your webhook integration using Clearout's built-in testing tools and local development environments. Proper testing ensures your webhook endpoints work correctly before handling real events.
Dashboard Testing
Clearout provides a built-in test interface that allows you to send sample webhook events to your configured endpoints. This is the easiest way to verify your webhook integration is working correctly.
Test Events Benefits
Webhook test events let you simulate real event payloads, so you can verify your endpoint configuration and ensure your application handles webhooks correctly before going live.
Accessing Test Interface
To access the webhook test interface:
- Log in to your Clearout App
- Navigate to the Developer section in the main navigation
- Click on Webhook in the left sidebar
- In the webhook list, click the Test Events button (paper plane icon) for any webhook
- You'll be taken to the Test Events interface
Test Events Interface
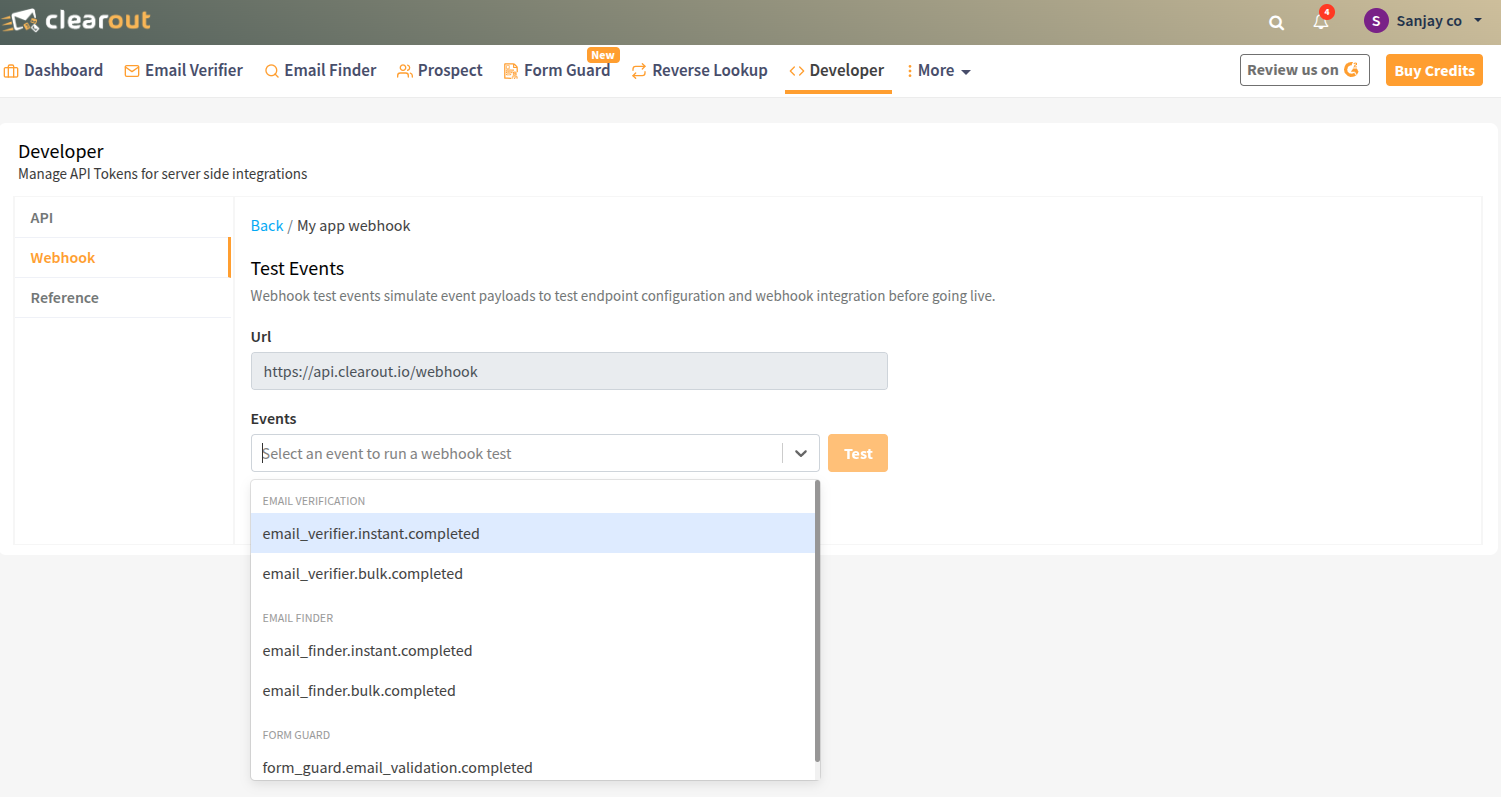
The test interface provides a simple form to send test webhook events:
URL Input
- Pre-filled URL - The webhook URL from your configuration is automatically filled in
- HTTPS Required - All test URLs must use HTTPS for security
- Configured Endpoints Only - You can only test your configured webhook endpoints
Event Selection
The Events dropdown contains all available webhook events organized by service. Select the event type you want to test from the dropdown menu.

Test Process
Testing webhooks is straightforward using the dashboard interface:
- Select Event Type - Choose the event you want to test from the dropdown
- Click Test Button - Send the test event to your webhook URL
- Verify Delivery - Check your endpoint to confirm the payload was received
- Check Event Logs - View delivery status and details in the event logs
Test Event Characteristics
- Test events are sent immediately (no retries)
- Test events are free and don't consume credits
- Test events have
event_mode: "test"in the payload - Test events appear in event logs for verification
Local Development
For local development, you'll need to expose your local server to receive webhooks. Here are the recommended approaches:
Using ngrok
ngrok is the most popular tool for local webhook development:
- Install ngrok:
npm install -g ngrokor download from ngrok.com - Start your local webhook server (e.g., on port 3000)
- Expose your local server:
ngrok http 3000 - Copy the HTTPS URL provided by ngrok (e.g.,
https://abc123.ngrok-free.app) - Use this URL as your webhook endpoint in the Clearout dashboard
ngrok Tips
The free ngrok plan provides a new URL each time you restart. For consistent testing, consider upgrading to a paid plan for static URLs, or use the ngrok authtoken for more stable URLs.
Alternative Tools
- webhook.site - Simple webhook testing service for quick testing
- Beeceptor - Mock API service with webhook support
- LocalTunnel - Open source alternative to ngrok
- Cloudflare Tunnel - Free tunneling service from Cloudflare
Test Payload Example
Here's an example test payload for email_finder.instant.completed:
{
  "event_id": "68994705edd8dab364becfe6",
  "event_type": "email_finder.instant.completed",
  "event_mode": "test",
  "event_on": "2025-08-11T01:27:33.597Z",
  "payload": {
    "status": "success",
    "data": {
      "emails": [
        {
          "email_address": "sinha@clearout.io",
          "role": "no",
          "business": "yes"
        }
      ],
      "first_name": "sinha",
      "last_name": "",
      "full_name": "sinha",
      "domain": "clearout.io",
      "confidence_score": 99,
      "_depreciated": {
        "confidence_score": 92
      },
      "total": 1,
      "company": {
        "name": "clearout"
      },
      "found_on": "2025-08-11T01:27:33.564Z",
      "credits_charged": 4
    }
  }
}
Test vs Live Events
The only difference between test and live events is the event_mode field. Test events use "test" while live events use "live". All other payload data remains the same.
Testing Signature Validation
When testing signature validation, you can generate test signatures using your webhook secret:
Signature Generation Steps
- Get the current timestamp:
Math.floor(Date.now() / 1000) - Create the data string:
timestamp + '.' + JSON.stringify(payload) - Generate HMAC-SHA256 hash with your webhook secret
- Format the signature header:
t=timestamp,v1=signature
Test Signature Example
// Example signature generation for testing
const crypto = require('crypto');

function generateTestSignature(secret, payload) {
  const timestamp = Math.floor(Date.now() / 1000);
  const data = `${timestamp}.${JSON.stringify(payload)}`;
  const signature = crypto
    .createHmac('sha256', secret)
    .update(data, 'utf8')
    .digest('hex');

  return `t=${timestamp},v1=${signature}`;
}

// Usage
const testPayload = { /* your test payload */ };
const secret = 'your-webhook-secret';
const signature = generateTestSignature(secret, testPayload);
console.log('Test signature:', signature);
Viewing Test Results
After sending a test event, you can view the results in the Event Logs:
Accessing Event Logs
- Click the View Event Logs button (eye icon) for any webhook
- Or click the Event Logs button at the top of the webhook dashboard
- Select the test event from the list on the left
- View detailed information in the right panel
Event Log Details
The event logs show comprehensive information about each webhook delivery:
- Summary Section - Event type, delivery status, timestamps, and webhook URL
- Event Data Section - Complete JSON payload that was sent to your endpoint
- Delivery Status - Success/failure status with response codes
- Mode Indicator - Shows "Test" for test events vs "Live" for real events
Next Steps
Now that you can test your webhooks, learn about webhook signature validation and understand webhook retry behavior for production reliability.